Sunday, 30 December 2012
Friday, 28 December 2012
Wednesday, 26 December 2012
Colonial Viper Mk.II
This is the Mk. II Colonial Viper from Moebius Models. Counted myself lucky to find one of these kits in 2010 and built it back then, but I never fully finished it and mostly cast it aside out of disappointment at my efforts. I couldn't achieve as clean a build as I wanted so gave it some mild weathering. I was also in two minds whether to build it in flight mode or with the landing gear down so the bottom section still remains loose.
Tuesday, 25 December 2012
Monday, 24 December 2012
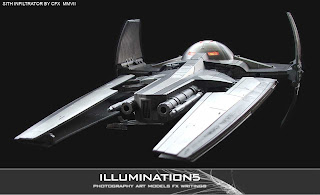
Sith Infiltrator
This is
the Hasbro toy of the Sith Infiltrator. I
added a few greeblies and lights to it and gave it a metallic paint job
so it would duplicate the sheen that it seemed to have in the movie.
The toy version expands on the screen craft by having an opening chassis to reveal additional weaponry.
The toy version expands on the screen craft by having an opening chassis to reveal additional weaponry.
Sunday, 23 December 2012
Saturday, 22 December 2012
Friday, 21 December 2012
Thursday, 20 December 2012
Cargo ship wip
I wanted to build a stocky ship, something in the manner of those endearing b-movies of the past where the ship crawls by the camera at an extremely slow pace yet the sound effects people add a jet engine fly-by sound.
I wasn't intending anything too elaborate and I fancied coming up with a kind of cargo duty craft. The fun of this project is that I would like to have some slight plausibility to the design and so I figure the cargo bay would be detachable, and I was planning on adding a type of frame over the top but that would go into Eagle territory. I would like something slightly different and reckon I could turn that idea on its side so to speak, and have the frame go around the side of craft, which can wilfully add to the stocky aspect.
I wasn't intending anything too elaborate and I fancied coming up with a kind of cargo duty craft. The fun of this project is that I would like to have some slight plausibility to the design and so I figure the cargo bay would be detachable, and I was planning on adding a type of frame over the top but that would go into Eagle territory. I would like something slightly different and reckon I could turn that idea on its side so to speak, and have the frame go around the side of craft, which can wilfully add to the stocky aspect.
Departing leftovers
I've been desperate for the chance to see what some of these builds look like in daylight (even if daylight is currently at the same levels as the planet Carillon). I finally managed to get the opportunity to do so.
Although only ever intended as simply a maquette, today helped me assess how lifeless this piece looks in pictures and that it has the potential to be better so I have made the decision to rebuild it and try to add some lighting to it.
I had a first attempt at the name tag but it didn't manage to stay intact. Here's a pic of the ghostly leftover.
Wednesday, 19 December 2012
A little more fumbling
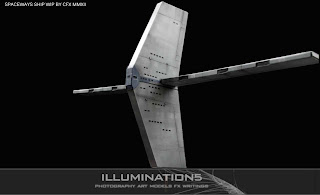
A couple of work in progress pictures of this particular build which I've decided to conceptualise as a commercial space liner model.
These first two pics are just after the initial painting was completed. I ended up making the windows with a marker and did not know if the ink would react or run when I coated it so, just took the pictures for reference and posterity in case I had to start again.
Thankfully the ink stayed intact and I could proceed with the rest of the painting. The sensor array and some appendages to the wings still remain to be modelled.
The following pictures are just test renders. Sadly I do not have access to a printer so for the time being don't know how to make logo or markings or decals other than painting them on by hand (which I am dreading), but in these test renders I added the 'Spaceways' tag digitally. The lights are also fake and have been added digitally as I built this without any lighting.
Monday, 17 December 2012
Fighter WIP
Two work in progress pics of an as yet untitled fighter craft. Mostly scratch built, with just a handful of kit pieces added like the tail fins. Initially it was going to be the standard space ship white paint job with maybe some red markings but I decided to try something different and went for a dark metallic base.
Sunday, 16 December 2012
Subscribe to:
Comments (Atom)


